
Quick answer: to create automatic subtitles, open the Subtitles tool in TranscribeGo, drag in your video (MP4, MOV or WEBM), choose the orientation, the subtitle language and the style, then hit Add subtitles. Our AI technology transcribes the audio, syncs every word and hands you back the video with the subtitles already burned in, ready to publish. It all happens in the browser: nothing to install, no video editing skills required.
Captioning by hand is one of the most tedious jobs in video: transcribe, break the sentences, nudge the timings, pick a font, export. A one-minute clip can easily eat 20 or 30 minutes. And without subtitles, a big share of your audience never finds out what you were talking about — most people watch social video with the sound off, and captioned clips get up to 40% more views than those without.
This guide walks through the whole process, step by step and with real screenshots of the tool, so you can go from a bare video to something ready for Instagram, TikTok, YouTube or LinkedIn.
What automatic subtitles are (and how they differ from an .srt file)
"Automatic subtitles" can mean two different things, and the difference matters:
- Burned-in subtitles: the text is part of the video image. It's always visible, on any platform and in any player, with nothing for the viewer to switch on. That's what you need for Reels, TikTok or Shorts.
- Subtitle files (.srt or .vtt): a separate file with the text and its timestamps. You upload it alongside the video on platforms like YouTube or LinkedIn, and viewers can toggle it on or off. It also helps with SEO, since platforms index that text.
TranscribeGo gives you both in the same flow: the video with subtitles burned in, plus the option to download the .srt or .vtt whenever you need it.
Step 1: Upload your video
Go to transcribego.com, sign in and open Subtitles in the sidebar, under Tools. You'll see a drag & drop area (you can also click it and pick a file from your computer).
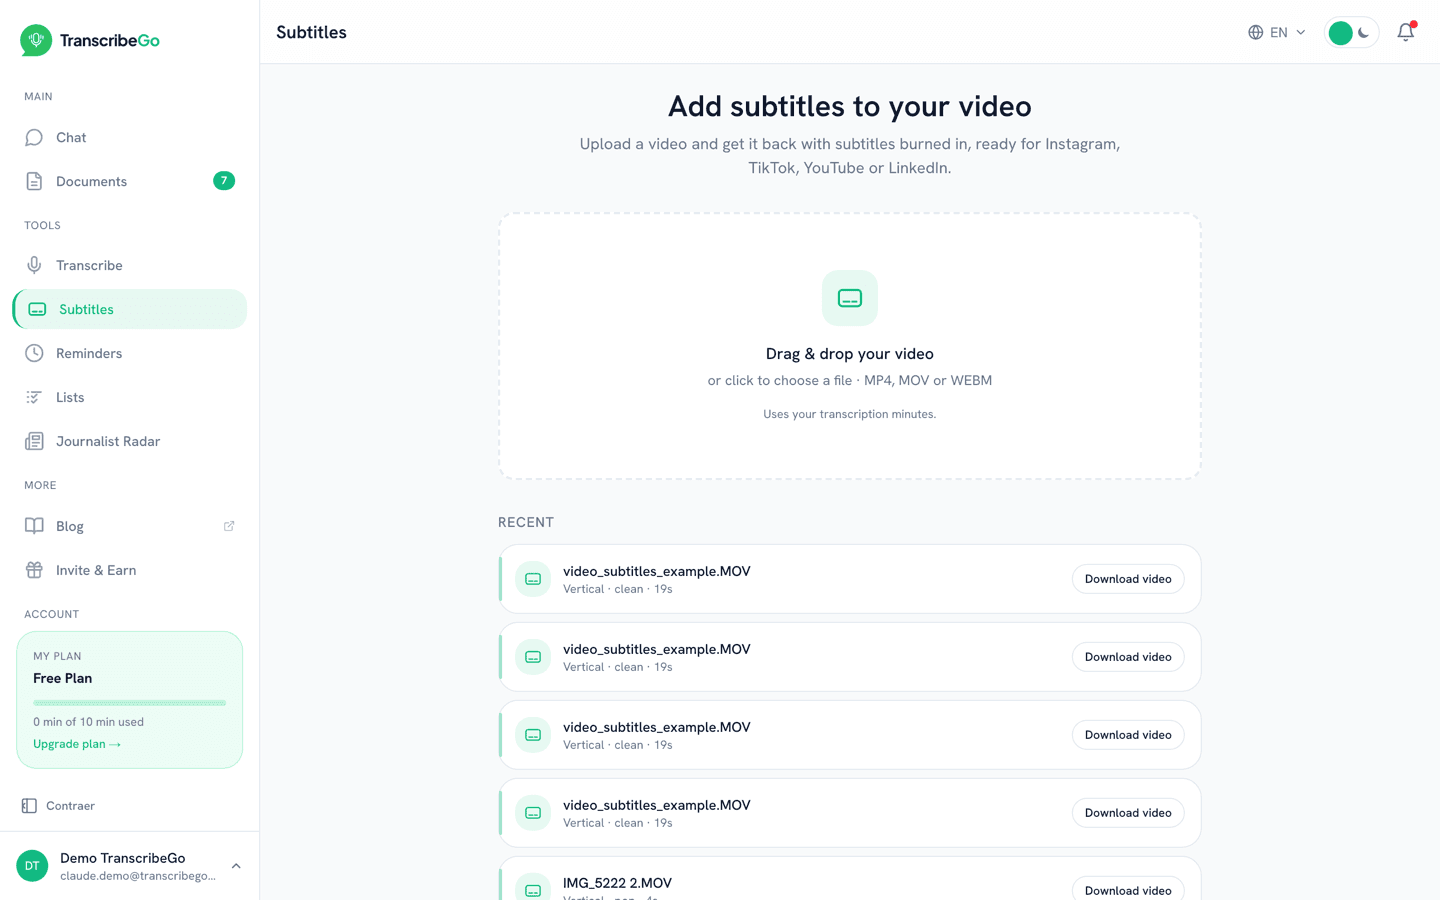
Accepted formats are MP4, MOV and WEBM, up to 500 MB per file. In other words: the video you shot on your phone, the one you exported from your editor or a screen recording all work as they are, with no conversion step first.
Below the upload area you'll find the Recent list with the videos you've already subtitled. From there you can re-download any of them or open one again to tweak it.
Subtitles use your transcription minutes — the same ones you spend transcribing audio. The Free plan includes 10 minutes per month, so you can try the tool on a couple of short clips before deciding anything.
Step 2: Choose the orientation and the language
As soon as you pick a file, a preview of the video appears with the configuration options underneath.
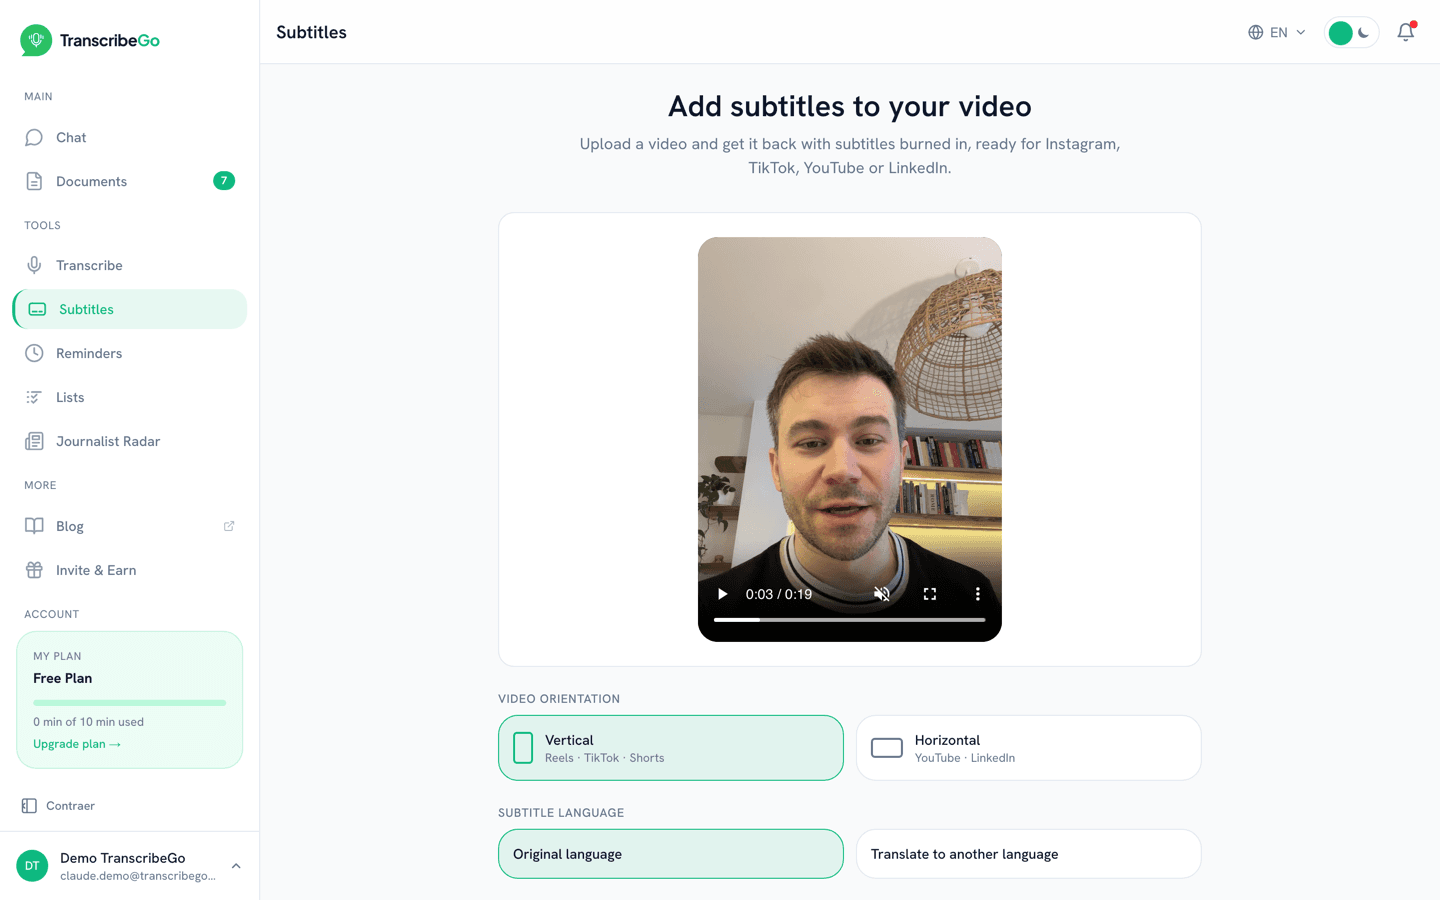
Video orientation. Choose Vertical for Reels, TikTok or Shorts, and Horizontal when the destination is YouTube or LinkedIn. This isn't a cosmetic setting: the orientation drives the font size, the margins and how many words fit on a line, so the text never ends up hidden behind each platform's interface. The tool preselects the right option based on your video's aspect ratio, but you can change it.
Subtitle language. By default the subtitles come out in the language spoken in the video. Pick Translate to another language and a selector opens with 12 available languages (English, Spanish, Portuguese, French, German, Italian, Hindi, Turkish, Arabic, Indonesian, Vietnamese and Russian). It's the fastest way to publish the same video for an audience that doesn't speak your language.
Step 3: Choose the subtitle style
Further down you'll find the three available styles, each with a thumbnail showing how it looks on screen.
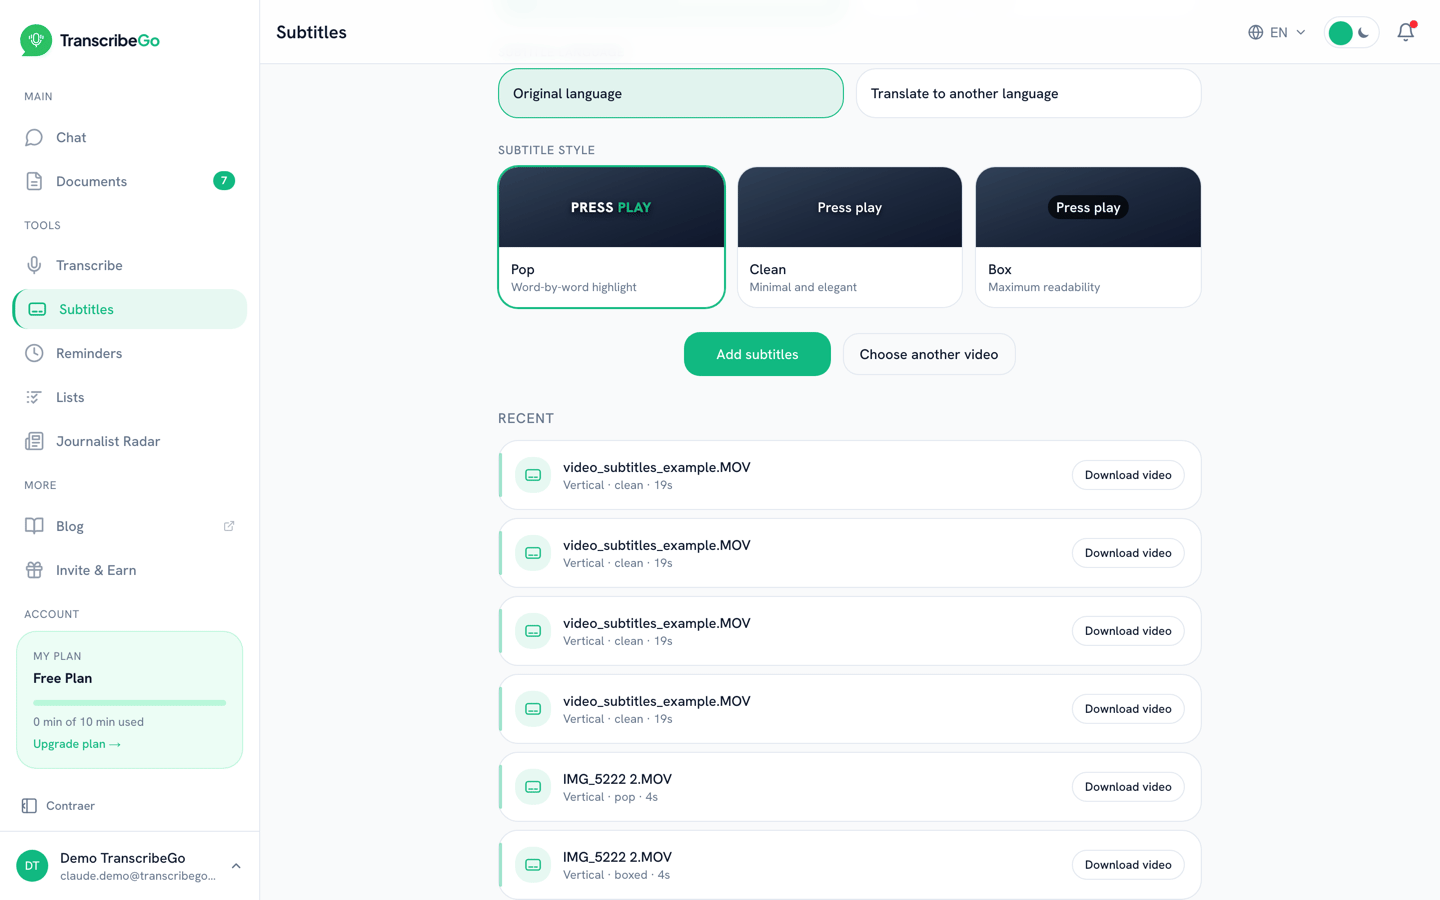
- Pop: highlights word by word as it's spoken. It's the classic social-video look that holds attention, and it works especially well in vertical.
- Clean: minimal and elegant, white text with no background. Ideal when the video is already visually busy, or when aesthetics matter more than impact.
- Box: text over an opaque box. The most readable option when the background is bright, shaky or high-contrast.
Once everything looks right, hit Add subtitles. The video uploads and the process starts.
Step 4: Let the AI do the work
From here there's nothing for you to do. Our AI technology transcribes the audio, detects the language, syncs every word to its exact moment and renders the video with the subtitles burned in using the style you picked.
It usually takes about as long as the video itself, so a one-minute clip is ready in roughly a minute. You can close the tab meanwhile: when you come back, the video is waiting in your Recent list.
Step 5: Review the result and download your video
When it's done, the subtitle studio opens: the finished video on the left, everything you can adjust on the right.
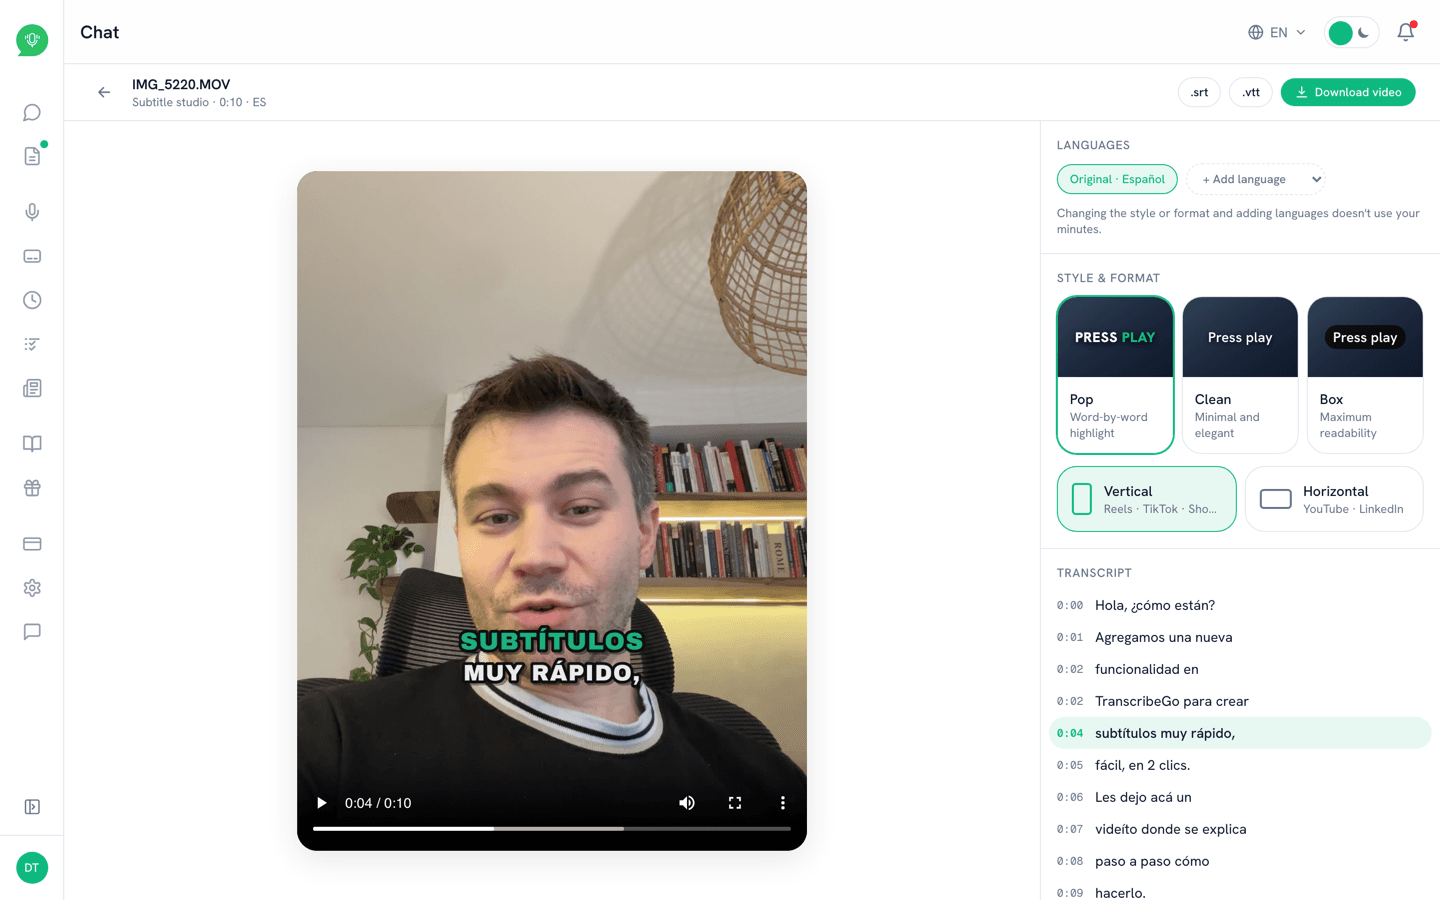
Hit play and check that it looks the way you want. At the top right there's the Download video button, which hands you the file with the subtitles already burned in, ready to upload anywhere. Next to it, the .srt and .vtt buttons let you download the subtitle file on its own.
Step 6: Change the style or add languages without spending minutes
This is the part that saves the most time. In the right-hand panel you can change the style (Pop, Clean, Box) or the orientation and press Apply & re-render: the video is rebuilt with the new setup in seconds.
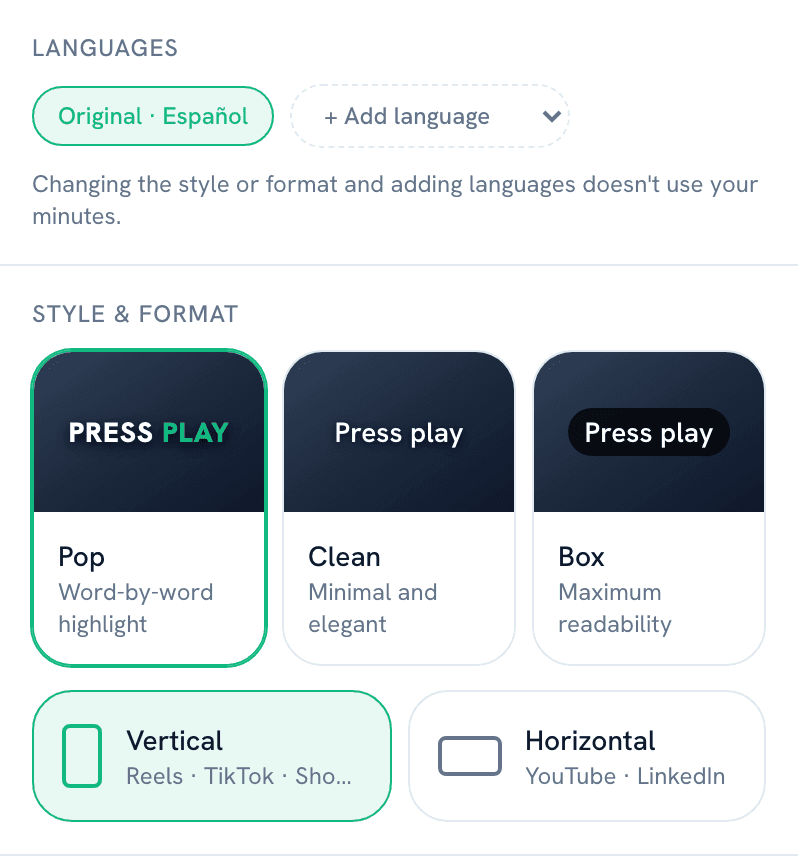
Under Languages, the + Add language button creates a new version of the same video with translated subtitles. Each version is kept as its own tab, so you can jump between the original and the translations and download whichever one you need.
The key detail: changing the style or format and adding languages doesn't use your minutes. Minutes are charged once, when the video is transcribed; from then on, every variant reuses that same transcript. You can try all three styles and keep the one that works best without paying three times.
Bonus: the timestamped transcript
At the bottom of the right-hand panel sits the full transcript, split into exactly the same blocks you see on screen, each with its timestamp.
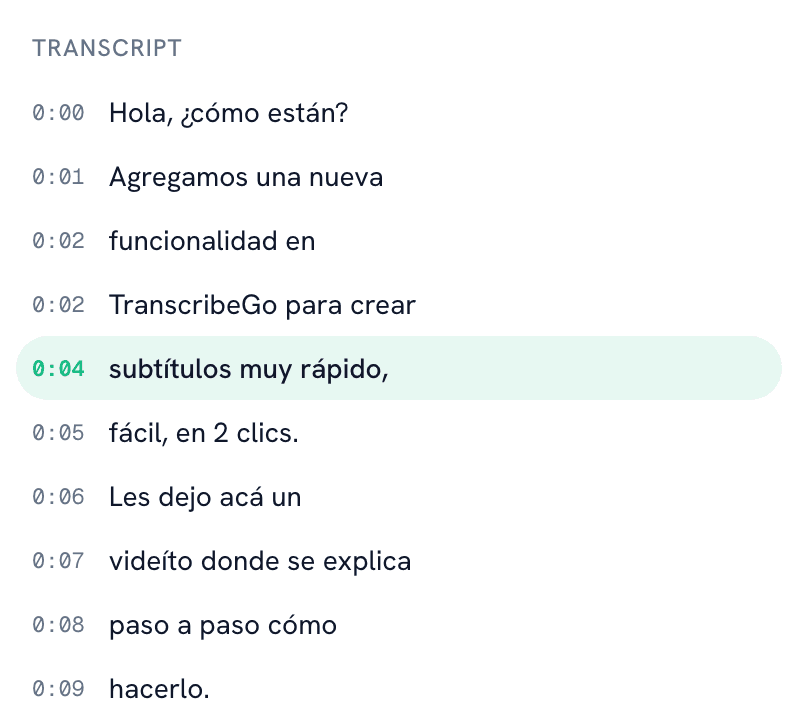
Click any line and the video jumps to that moment. It's the fastest way to double-check a name, a fact or a figure, and also to reuse the content: that same text works as the caption for your post, the video description or the seed of an article.
Tips to get more out of your subtitles
- Fix the audio first. A decent microphone and low background noise improve the transcript more than any setting you change afterwards. If you're recording on a phone, get closer and avoid echoey rooms.
- Match the style to the background. Over bright or busy footage, Box wins every time. Over dark, steady footage, Pop and Clean read perfectly.
- Vertical for social, horizontal for long-form platforms. If you're publishing the same content in both formats, render both versions from the studio — the second one costs you no minutes.
- Use the translation. A video that performed well in your language usually performs just as well translated. It's new content with zero extra production.
- Upload the .srt too when the platform allows it. On YouTube or LinkedIn, on top of the burned-in subtitles, the text file helps your video surface in search.
If something goes wrong
The tool tells you exactly what happened when it can't process a video. The most common cases:
- "This video has no audio track": the file is image only. With no audio there's nothing to transcribe.
- "We couldn't detect any speech in this video": there is audio, but it's only music or ambient noise.
- "Unsupported format": export or convert the file to MP4, MOV or WEBM.
- "File is too large": the limit is 500 MB. Export the video at slightly lower quality or split it into parts.
- "This video is longer than your remaining minutes": you need more minutes for that clip. You can check the available plans on the pricing page at transcribego.com, which shows the values for your country.
Try TranscribeGo Free
10 free minutes. No credit card required.
Are automatic subtitles burned into the video, or a separate file?▾
Both. The video you download already has the subtitles burned into the image, so they show up on any platform without the viewer switching anything on. You can also download the .srt or .vtt file separately, in the video's original language, for platforms that accept subtitles as a separate track.
How long does it take to generate a video with automatic subtitles?▾
About as long as the video itself. A one-minute clip is usually ready in roughly a minute. You don't need to keep the tab open — the result is saved in your list of recent videos.
Can I edit the subtitle text if the AI got a word wrong?▾
In the studio you can see the full timestamped transcript and review the result line by line. For text corrections, the most practical route today is to download the .srt file, edit it, and use it as the subtitle track on the platform where you publish.
Does changing the style or translating the subtitles use more minutes?▾
No. Minutes are charged once, when the video is transcribed. Switching between Pop, Clean and Box, flipping between vertical and horizontal, or generating versions in other languages all reuse that same transcript and never charge minutes again.
What formats and video lengths can I upload?▾
You can upload MP4, MOV and WEBM files up to 500 MB. The maximum length depends on the transcription minutes available in your plan: the Free plan includes 10 minutes per month.
